
The History
The KZ750 was never a motorcycle I set out to buy. I knew I wanted a to buy a cheap motorcycle off of Facebook Marketplace and try my hand at a café racer build, but I was hoping to find a good CB750. As fate would have it, I stumbled across the KZ750 instead. And I am so glad that I did.
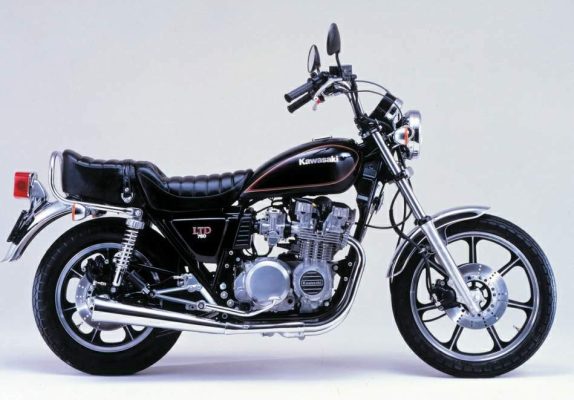
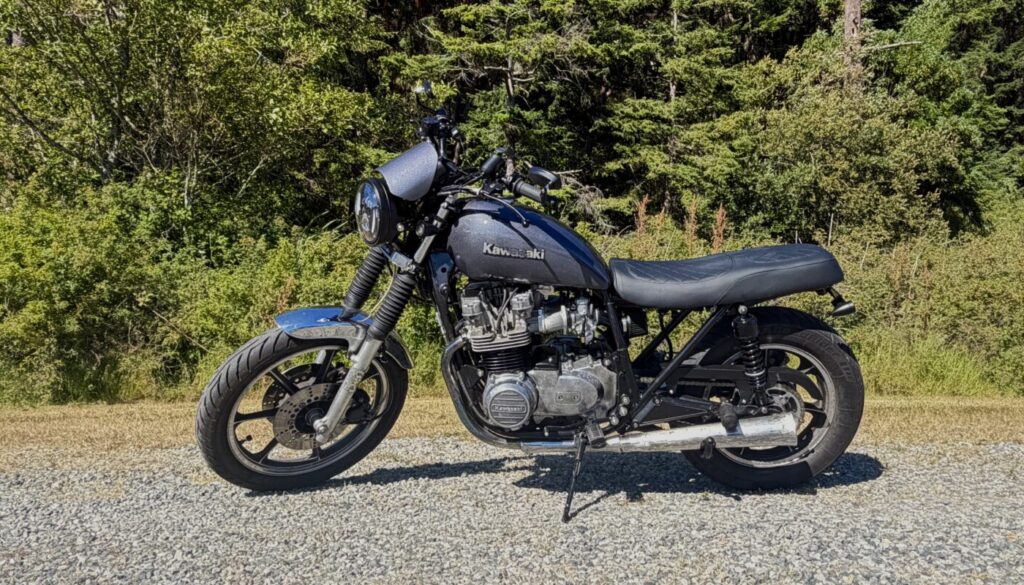
The 1981 KZ750-H2 (LTD) is a glorious inline-4 cruiser. DOHC, chain-driven, 5-speed, air-cooled, just like the CB750. While it seems very similar to the competition, there are more differences than you might expect. While the CB750 has practically every mark of a vintage inline-4 cruiser, the KZ750 does something else entirely.
It’s a vintage cruiser with the engine and power-delivery of a sportbike. Literally.
The inline-4 KZ750’s evolved into the GPZ750 in 1983 and share many of the same components. Kawasaki later changed the naming convention to ZX750 and ZX900. Sound familiar?
Yep. The KZ750 is the predecessor to both the Ninja sportbike and the Z-series naked bike.
But history aside, how does the KZ750 compare to the CB750? Turns out, Kawasaki went all out for this line. Aesthetics aside, being more personal taste, the ’79-82 KZ750 has several edges over the CB750. Slightly higher horsepower (depending on your source), identical torque, but 10-30 pounds lighter depending on the model. The CB750 does have a slight edge on maneuverability in terms of lean angle and speed of turning, but the KZ750 feels more planted and stable.
The biggest difference, however, is the feel of the bike. The CB750 has pretty linear power delivery. Easy riding. The power band on the CB750 is wide. The KZ750, on the other hand, gives you a surge of power over 7k RPM, screaming to life where the CB750 continues on its linear acceleration.
It’s hard to understate how fun it is riding this KZ. It really does feel like just and ordinary cruiser, all until you hit that sweet spot above 7k RPM and it suddenly starts feeling like a sportbike.
The Purchase
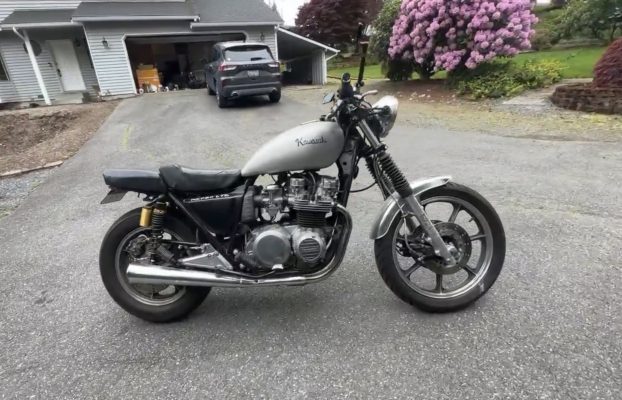
After struggling to find a decent CB750 for under $2,000, I stumbled across this 1981 KZ750-H2 on FB Marketplace. The previous owner had attempted to turn it into a café racer, but got stuck on wiring the Motogadget system. As such, I got the bike with barely 10k miles, the shop manual, and several boxes of parts for $1,000. Nice. Minus the part where I had no proof that it ran. Oh well.
I towed it home and after sitting in my garage for several months (I got distracted by a beautiful BMW K75 at the time), I finally got around to working on the bike. It was my first time trying out the Motogadget M-Unit, and I had so much to figure out. After several weeks of wiring and troubleshooting, I replaced nearly all of the old electronics. I then saw why the previous owner gave up on the project; there was no good place to mount the M-Unit, unless you had metal fabrication skills. Which I didn’t.
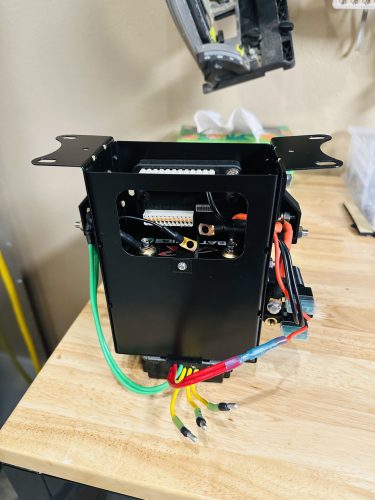
Undeterred, I purchased a CNC laser-cutter and started trying my hand at metal-working. I cut out parts for a battery box, purchased a sheet metal bender, and made a janky metal box. After discovering the bend limits of a finger brake, I ended up making the box in several pieces of metal that were riveted together. Then, I had added the absolute worst powder-coating job possible to the bare metal. It looked horrific. But it fit! I ended up remaking it later, but I at least had a place to put everything.
After much more deliberation and learning for the first time that there are different types of voltage regulator/rectifiers (this bike uses magneto-style rect/regs, no field coils), I finally had the bike wired up. After a brief detour making a new tail tidy, which I really should have tried before the battery box as it was so much simpler, I cleaned out the carbs and tried firing it up.
And it ran, first try! Turned over so smoothly. The idle was definitely off though. I was not really worried about this at the time. Little did I know that was a harbinger of things to come.
The Rebuild
Did the first carb rebuild, and immediately had a sinking feeling. The previous owner had rebuilt the carbs less than two years ago, but half of the jets were far overtightened. Replaced what I could, reinstalled the carbs, no change, but I noticed the fuel bowl gaskets had leaks. 3D-printed my own custom TPU gaskets (which worked perfectly by the way), but still had rough idle. After applying just a little throttle, the RPMs would skyrocket even after the throttle closed. Carb cleaner sprayed around the intake boots with the engine running revealed several vacuum leaks. Replaced the intake boots which solved that problem, but I still had a very rough idle that would sputter out below 2k rpm, far from the factory-recommended 1.2k idle.
At this point, the color-tuner I had ordered finally arrived. I thought it was broken at first, no spark on cylinder one. Turns out, it did in fact work. My first cylinder just had no spark. Back to rewiring the bike. Replaced the ignition coils, spark plugs, and installed a Dyna-S electronic ignition system. The idle became even worse. I then tried out an ignition timing light and saw my ignition was way off. The ignition points plate that was supposedly made for this bike just did not have the right hole spacing to rotate the contacts into the right spot. So I ordered a cheap Chinese ignition system. Same issue. At this point, I decided just to get a Dremel out and carve out the right slots. Ignition timing successfully restored! Wished I had tried that with the Dyna-S still installed, but at that point it was working and I was too tired to swap everything back out.
Now cylinder one had spark again. But I had celebrated too soon, it was misfiring every 5-10 seconds, missing a full ignition event and then having an extra big pop on the next power stroke. Eager to ride this bike I had been working on for months, I dialed up the idle RPM and took it for its maiden voyage. It was rough, yet so much fun. The bike would stutter past 8k rpm, it would nearly stall when it misfired taking off in first gear, I discovered my front tire was nearly flat from a slow leak, the fuel sensor gasket was leaking, and it had a serious oil leak from the oil filter.
But it ran. My energy for this project was restored. Now I had a decision to make.
In my naivety, I truly thought this project would be a simple fix-n-flip where I could make a few hundred bucks profit. That ship had long sailed. I had done enough troubleshooting by this point to be 90% certain that a clogged pilot jet in the carb for cylinder 1 was the issue. But new carbs were surprisingly pricey (a downside of inline-4’s). I hesitated for a couple of weeks, but finally decided to pull the trigger and buy the 4-into-2 carb kit from Murray’s Carbs. And while I was at it, why not fix up a few things?
The New Vision
Enter a 4-month long grueling period of redefining what I wanted for this bike. And it was grueling indeed.
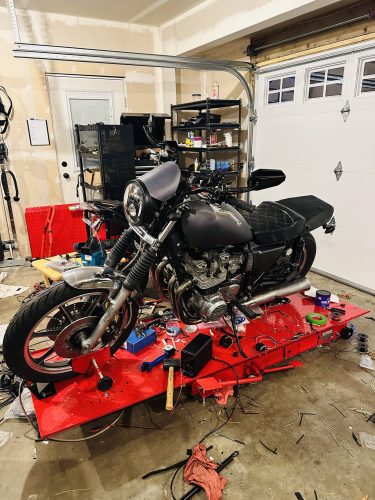
I fabricated a bracket to remount the instrument cluster, with aftermarket analog gauges.
I had no experience in automotive painting. But I knew that rusty tank needed a good rust removal and paint job. So I bought an HPLV spray gun, and attempted to hand-sand the tank. Boy was that not fun. 6-hours in with barely 20% of the paint gone, I decided to try to squeeze the tank into my sandblaster. Surprisingly enough, it fit! Barely. But the process went so much faster. After one hour of sandblasting, the paint was fully off. I spent several days following a rust-removal process and letting the tank dry out. Previously, I spent a full week on a different bike trying out the POR-15 system. So much work, drying was a pain, and the final tank coating had a terrible cure-time, mostly due to it being nearly impossible to get the excess to drain out with how viscous it was. This time, I went with EvapoRust. If your bike doesn’t have any pinhole leaks, trust me, just use EvapoRust, you don’t need POR-15.
After the tank had dried and bondo was applied, I began painting. The first attempt was a great example of why over-spraying is bad. Such a pain. But the Meteor Gray Metallic Paint I had chosen looked stunning nonetheless. I reinstalled the fuel sensor and petcock, and made the foolish mistake of deciding not to use a clear-coat. The texture and matte color was so perfect, I didn’t want to take away from it. But that was a massive mistake. I knew gasoline was hard on paint, but I didn’t realize how harsh it was. Within 2 days, serious bubbling occurred in the paint near the lid and where I found the fuel sensor seal had failed.
Lesson learned. Back to the sandblaster. Yet another paint job, but this time I used a 2-part clear coat epoxy. Still had a bad habit of over-spraying, but my Bondo game had improved so while not perfect, the tank looked so much better. Still leaks around the fuel sensor though. This time, I decided to try my TPU trick and 3D print a new gasket as all of the ones I had found online were in fact not the right fit. With a little help from Permatex gasket maker, the sensor was now air-tight.
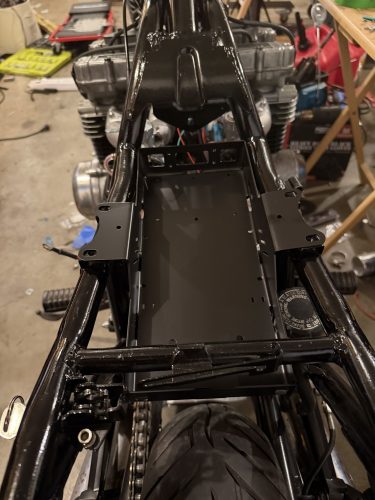
Now the fun part began. My initial wiring of the Moto-gadget was messy as I was learning as I went. I also decided to do a few more drastic design changes. So, I took off the side fairings of the bike, ground down all of the metal mounting points, purchased a new brat-style café racer seat, and completely redesigned the battery box to be flat, giving a hollow-center look through the rear subframe that I loved in so many café racer builds. The battery box came out fantastically (on the third try), and I 3D-printed some more mounting solutions to house the starter solenoid and a couple relays to give more usable power.
My gauges also did not work with my fuel sensor, so I went on a side-quest to design my own circuit to turn on a dash light when the thermistor-style fuel sensor reached a certain resistance. Turns out it was more complicated than I thought, as aged components gave me a totally different resistance value than I thought. but with some tuning, it ended up working perfectly.
Remade the dash bracket to accommodate some new lights. Installed recessed lighting for the oil, neutral, and fuel lights after discovering my gauges somehow didn’t have a neutral light. The other two lights were mostly just to fill space.
With the wiring complete, I started the bike up and… a horrible clattering sound happened. Again. And again. I panicked. Disassembled the starter motor, cleaned it out, and reinstalled it. No visible damage. Replaced the starter solenoid. No change. At this point, I was dreading the idea of replacing the starter clutch, which was a very long bottom end disassembly that I had read many people messing up on. I scrambled to find another problem it could be.
After hours of research and multi-meter testing, I resorted to asking Chat-GPT. Turns out I did make a wiring mistake. But not at all what I expected. All of my connections were correct, but the ground path for the starter motor was returning through a 16-gauge wire. It simply was not a thick enough wire to properly sink all of that current. A simple fix that only took 4-hours to figure out and 2 minutes to correct.
Now the time to install the carbs had arrived. I quickly discovered one critical oversight; the Murray’s Carbs kit I had ended up putting the pod filters right where the corners of my new battery box were. I didn’t want to remake that box again, so I decided to try 3D-printing a solution. Using ASA filament, I created a curved tube between the pod filters and the carbs. Took quite a few test prints I will say. ASA prints at a very high temperature, which makes precise dimensions more annoying as the plastic contracts when it cools. But eventually, I had my adapters and they work perfectly to this day.
Now it was time to re-fire the bike up after nearly 5 months. I was nervous, hoping my investments wouldn’t be for nothing. To my surprise, she fired up immediately. Big win for Murray’s Carbs! I took her out again for her second ride. It was rough, but not nearly as bad as before. My brakes were soft, my clutch lever worked sometimes, and the bike would die when the choke was off. But feeling the power of these new carbs had me excited. The engine could breathe. I was excited. Then I pulled into a gas station for a refuel, and the bike would not start back up. The clacking noise was back. You could hear the starter clutch struggling to engage. On the positive side, a small bump start immediately resolved the problem. Back to the garage.
The Final Stretch
Tuning the carbs was a bit of a struggle, as the recommended ranges were not giving me good results. I had surmised at that point that my valves were out of spec. I got back to work on repairs. After an hour of tuning the idle and mixture screws to factory spec with no improvement, I decided to follow my gut and listen to what the color tune told me. Rich yellow flame with the choke on, faint blue flame with the choke off. The mixture was too lean. I turned the mixture screw in all the way and backed it out only a single turn. Success! Idle still higher than it should be at about 1700 RPM, but it was still a vast improvement over having to keep the choke on during the hot summer day, idling at 4k.
The problem with my valves, just like my clutch return and starter clutch issues, simply boiled down to worn out springs. And the problem with my oil and vacuum leaks were just old worn-out rubber. Other than those, this bike wanted to run from the start. Beautiful.
And so I set off for my first ride since the latest rebuild. It’s wild how much joy you feel finally being able to ride the project you’ve been working on for months. It makes all of that struggle worth it, and it makes you appreciate every second you spent working on that bike.
My KZ750 project is by no means done. I want new tires and to fix the slow air leak, still need to rebuild my starter clutch which works 60% of the time, need new chain and sprocket ratio for higher top speed, and I want to stick a custom exhaust on this thing. Maybe even do a full front fork replacement. It’d be nice to get some laced wheels as well.
But for now, I’m thrilled to ride this beast. Tops out right at 100 mph (though that is hard to test where I live), but once those valves are dialed in and the sprocket ratio changed, I know this thing could easily hit 110+. With a performance cam, likely 120mph.
This is a bike that gets compliments wherever it goes. And it’s a piece of history, the predecessor to the Ninja and the Z. And I love it. Hearing that inline-4 scream down the freeway is a thing of beauty.

We use cookies to improve your experience on our site. By using our site, you consent to cookies.
Manage your cookie preferences below:
Essential cookies enable basic functions and are necessary for the proper function of the website.